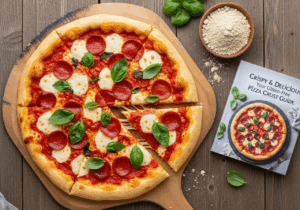
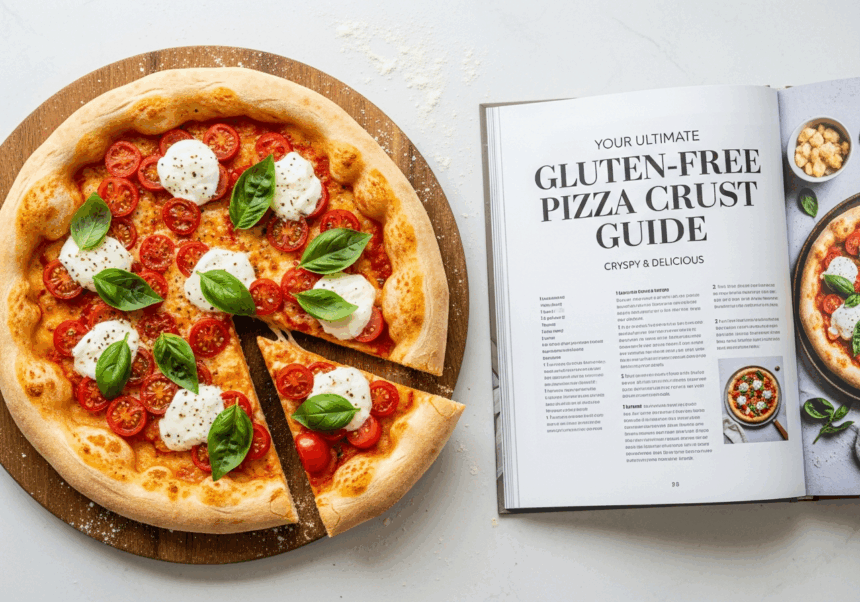
There’s something undeniably magical about biting into a perfectly crispy, golden pizza crust-the satisfying crunch giving way to a tender, flavorful base that holds all your favorite toppings in harmonious delight. But for those navigating the world of gluten-free baking, achieving that ideal crust can feel like chasing a culinary unicorn. Fear not! “Crispy & Delicious: Your Ultimate Gluten-Free Pizza Crust Guide” is here to unravel the secrets behind crafting a gluten-free crust that’s every bit as delightful, if not more so, than its traditional counterpart. Whether you’re a seasoned pro or a curious beginner, this guide will equip you with expert tips, ingredient insights, and foolproof techniques to transform your pizza nights into crispy, cheesy celebrations-without a trace of gluten.
crispy & Delicious: Your Ultimate Gluten-Free pizza Crust Guide
Embarking on the journey to create a perfectly crispy gluten-free pizza crust is both an art and a science.With the right selection of gluten-free flours, mastering dough preparation, and employing expert baking techniques, you’ll bring home a crust that rivals traditional wheat-based pizzas in crunch and flavor. From the moment the dough hits the oven to that delightful snap on the first bite, your pizza experience is about to be transformed forever.
Prep and Cook Time
- Preparation: 20 minutes
- Rising Time: 1 hour 15 minutes
- Baking: 15-20 minutes
Yield
1 large 12-inch pizza (serves 3-4)
Difficulty Level
Medium – perfect for confident home bakers eager to master gluten-free baking techniques.
Ingredients
- 1 cup brown rice flour, sifted
- 1/2 cup tapioca starch (for elasticity and crispiness)
- 1/4 cup almond flour (for richness and structure)
- 1 tsp xanthan gum (to mimic gluten’s binding properties)
- 1 tbsp sugar (feeds the yeast for perfect rising)
- 1 tsp fine sea salt
- 1 packet (2 1/4 tsp) active dry yeast
- 3/4 cup warm water (105-110°F / 40-43°C)
- 2 tbsp olive oil (+ extra for brushing)
- Optional: 1 tsp garlic powder or Italian seasoning for subtle flavor
Instructions
- Activate the yeast: In a small bowl, combine warm water with sugar and active dry yeast. Stir gently and let it sit for 5-10 minutes until the surface bubbles and foams, indicating active yeast.
- mix dry ingredients: In a large bowl, whisk together brown rice flour, tapioca starch, almond flour, xanthan gum, and sea salt (and seasoning if using).
- Combine wet and dry: Pour the yeast mixture and olive oil into the dry ingredients. Stir with a sturdy spoon or a stand mixer fitted with a paddle attachment until a soft, slightly sticky dough forms.
- Knead gently: Lightly flour your workspace with brown rice flour. Transfer the dough and knead carefully for about 2-3 minutes until smooth but still pliable. Avoid over-kneading to keep the texture tender.
- First rise: Grease a large bowl with olive oil. Place the dough inside, cover with a clean, damp kitchen towel or plastic wrap, and let it rise in a warm spot for 1 hour or until it almost doubles in size.
- Preheat and prepare pan: Preheat your oven to 475°F (245°C). If you have a pizza stone, place it in the oven to heat. Lightly oil a 12-inch pizza pan or line with parchment paper.
- shape the dough: Transfer the dough onto the pizza pan or parchment. Using floured fingers or a rolling pin, gently press and stretch the dough into a 12-inch circle with a slightly thicker edge to form a crust rim.
- Par-bake the crust: Bake the crust for 8-10 minutes, until the edges begin to turn golden and the surface feels firm but not fully browned.This crucial step helps develop a crispy base.
- Add toppings and bake again: Remove the crust, add your favorite sauce and toppings, then return to the oven for an additional 7-10 minutes until cheese bubbles and crust is deeply golden and crisp.
- Cool briefly and serve: Let the pizza cool for 5 minutes to allow the crust to set for that irresistible crispy gluten-free texture. Slice and enjoy!
tips for Success
- Flour combination matters: The blend of brown rice flour, tapioca starch, and almond flour balances structure with crispiness. Almond flour adds moisture and richness, while tapioca starch creates the signature stretch and crunch.
- Keep your water warm but not hot: Yeast activates best between 105-110°F. Too hot will kill it, too cold delays rising.
- Xanthan gum is key: This binding agent replaces gluten for elasticity and helps trap air bubbles during rising.
- Par-baking elevates crunch: Baking the crust before toppings prevents soggy dough and boosts firmness.
- Don’t skip the rest: Allowing dough to rest in a warm place helps develop flavor and gives the gluten-free crust a lighter texture.
- Make-ahead option: You can prepare dough the night before, let it rise slowly in the fridge overnight, then bring to room temperature before baking.
Serving Suggestions
Serve your crispy gluten-free pizza crust with a drizzle of high-quality extra virgin olive oil and fresh basil leaves to enhance aroma and freshness. Complement with a side salad featuring peppery arugula and a lemon vinaigrette for balance. For sauces, classic tangy tomato or a white garlic butter sauce pairs beautifully. Finish with toppings like roasted red peppers, mozzarella pearls, olives, or caramelized onions for a flavor-packed experience that celebrates a truly crispy and delicious gluten-free pizza.

| Nutrient | Per Serving (1/4 pizza) |
|---|---|
| Calories | 320 |
| Protein | 8g |
| Carbohydrates | 40g |
| Fat | 12g |
For those eager to further perfect their gluten-free baking, check out our detailed guide on best gluten-free baking techniques. For science-backed benefits of various gluten-free flours, visit Whole Grains Council.
Q&A
Q&A: Crispy & Delicious – Your Ultimate gluten-Free Pizza Crust Guide
Q1: Why is achieving a crispy gluten-free pizza crust such a challenge?
A1: Gluten acts like a stretchy net in traditional dough, trapping air bubbles and giving crust its structure and chewiness. Without gluten, gluten-free flours lack that natural elasticity, often resulting in a denser or softer crust. That’s why getting that satisfying crunch requires a strategic blend of ingredients and techniques.
Q2: What are the best gluten-free flours for a crispy pizza crust?
A2: A combo is key! Rice flour, tapioca starch, and potato starch are popular as they contribute lightness and crispness. almond flour adds richness and a slight nuttiness,while sorghum or oat flour can provide body. Mixing these flours balances taste and texture for that perfect bite.
Q3: Can I make a crispy crust without xanthan gum or guar gum?
A3: Absolutely! While gums help mimic gluten’s elasticity, you can rely on alternatives like psyllium husk powder, ground flaxseeds, or chia seeds. These create a gel-like texture that binds the dough together and helps lock in moisture, enhancing both structure and crispness.
Q4: Does resting the dough matter in gluten-free pizza making?
A4: Yes, resting is crucial! Allowing the dough to rest for 20-30 minutes hydrates the flours fully, improving dough cohesion. It also makes shaping easier and can contribute to a more crisp, less crumbly crust.
Q5: How critically important is baking temperature for a crispy gluten-free crust?
A5: Very! High heat (around 450-500°F or 230-260°C) is your best friend. It quickly evaporates moisture, creating that golden, crunchy exterior while cooking the dough through. Using a pizza stone or steel can also simulate a hot oven floor, giving your crust an extra boost of crispness.
Q6: Should I pre-bake (par-bake) the crust before adding toppings?
A6: Par-baking is a smart move for gluten-free crusts. Baking the crust for 5-7 minutes before piling on toppings prevents sogginess, ensuring the crust stays crispy beneath the cheese and sauce.
Q7: Any tips for preventing a soggy crust after baking?
A7: Definitely keep your sauce on the lighter side and avoid watery toppings. Draining vegetables like mushrooms or spinach before placing them on the pizza helps immensely. Also, letting your baked pizza cool on a wire rack keeps air flowing under the crust, maintaining crunch.
Q8: Can I freeze gluten-free pizza dough for later use?
A8: Yes! Gluten-free dough freezes well.Shape it into a disc,wrap tightly,and freeze. When ready, thaw in the fridge overnight and let it come to room temperature before baking. Keep in mind dough hydration may slightly vary upon thawing, so a gentle hand is needed.
Q9: Any secret ingredients to elevate flavor and crispiness?
A9: A small drizzle of olive oil brushed on the dough edges before baking adds lovely golden color and crunch. A pinch of garlic powder, Italian herbs, or Parmesan mixed into the crust can also boost flavor while helping the exterior crisp up.
Q10: Is homemade gluten-free pizza crust more rewarding than store-bought?
A10: Without a doubt! Crafting your own crust allows you to tailor textures and flavors while avoiding preservatives and additives. Plus, it’s a delicious adventure in gluten-free baking that results in a truly satisfying, crispy masterpiece. Homemade means pizza night just got personal-and perfect.
Wrapping Up
Whether you’re a seasoned gluten-free baker or just embarking on your pizza-making journey, mastering the art of a crispy, delicious gluten-free crust is well within reach. with the right ingredients, techniques, and a dash of culinary adventure, you can transform any pizza night into a flavorful party that satisfies both craving and dietary needs. So roll up your sleeves, experiment with flours and toppings, and enjoy every golden, crunchy bite-as gluten-free doesn’t mean flavor-free. Your perfect crust awaits!