ThereS something undeniably comforting about a warm, cheesy dish that wraps you in layers of rich flavors and creamy textures-and few Italian classics deliver this cozy indulgence better than manicotti. Whether you’re a seasoned pasta lover or just beginning to explore the world of homemade Italian cuisine, “Creamy Delight: Your Guide to Easy Cheesy Manicotti” is here to transform your kitchen into an authentic trattoria. This article will walk you through simple, foolproof steps to create a luscious, cheesy feast that’s as satisfying to make as it is to devour. Prepare to dive into a melt-in-your-mouth experience that turns ordinary ingredients into unusual comfort food.
Creamy Delight: Your Guide to Easy Cheesy manicotti
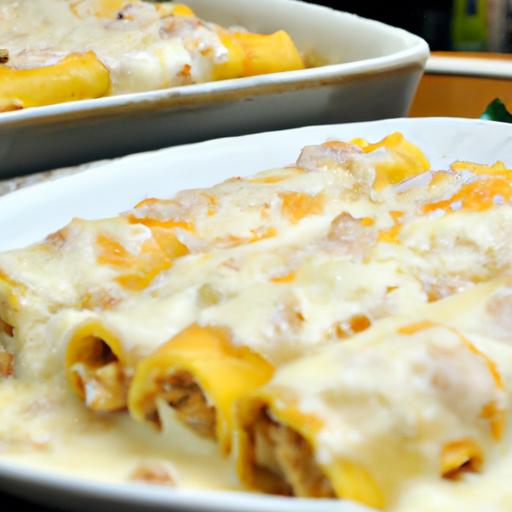
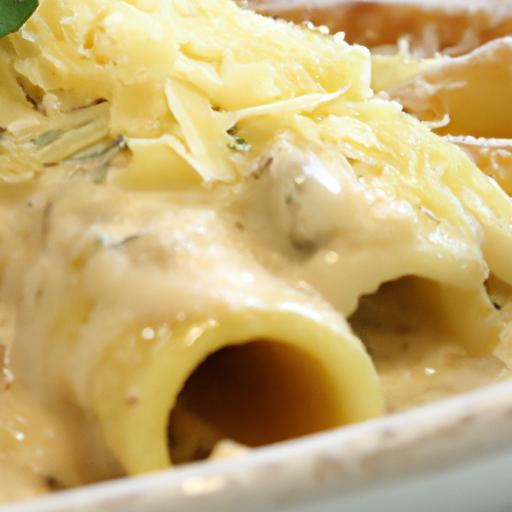
Nothing captures the essence of Italian comfort food quite like the creamy delight of cheesy manicotti.This luscious dish, with its rich layers of velvety filling nestled inside tender pasta tubes, evokes memories of family dinners and festive gatherings. Originating from the heart of italy,manicotti has traveled far and wide to become a beloved classic,cherished for its combination of creamy textures and robust flavors. Whether you’re preparing it for a crowd or an intimate dinner,mastering this recipe will inspire you to bring a little warmth and joy to your table.
Prep and Cook Time
- readiness: 25 minutes
- Cooking: 40 minutes
- Total Time: 1 hour 5 minutes
yield
serves 6 hearty portions
Difficulty Level
Easy to Medium – perfect for anyone comfortable with basic kitchen skills, but made approachable with clear, reliable steps.
Ingredients
- 12 manicotti pasta shells
- 2 cups ricotta cheese,well-drained
- 1 cup shredded mozzarella cheese
- ½ cup grated Parmesan cheese
- 1 large egg
- 2 cloves garlic,finely minced
- 2 tbsp fresh parsley,chopped
- 1 tsp dried Italian seasoning
- Salt and freshly ground black pepper,to taste
- 3 cups marinara sauce,homemade or store-bought
- 2 tbsp olive oil
Instructions
- Cook the manicotti shells in a large pot of salted boiling water until al dente,usually 7 to 8 minutes. Stir gently to prevent sticking.Drain and rinse with cold water to halt cooking. Lay the shells flat on a lightly oiled baking sheet to avoid clumping.
- Prepare the cheese filling: In a medium bowl, combine ricotta, mozzarella, Parmesan, egg, minced garlic, parsley, Italian seasoning, salt, and pepper. Mix gently until all ingredients are thoroughly blended, creating a creamy, smooth texture.
- Preheat the oven to 375°F (190°C) and lightly grease a 9×13 inch baking dish with olive oil.
- Fill each manicotti shell using a piping bag or small spoon. Spoon the creamy cheese mixture carefully into each shell, ensuring they’re filled generously but without bursting.
- Spread a thin layer of marinara sauce evenly on the bottom of the baking dish. Arrange the filled shells in a single layer, close but not overcrowded.
- Pour the remaining marinara sauce over the manicotti, fully coating the pasta to keep it moist and add layers of flavor.
- Drizzle with olive oil and sprinkle additional mozzarella and Parmesan on top for that beautiful golden crust.
- Bake uncovered for 35 to 40 minutes, until bubbling hot and the cheese topping turns golden brown.
- Let rest for 5 minutes before serving to allow flavors to settle and the filling to firm up slightly, ensuring every bite is perfectly luscious.
Chef’s Notes: Tips for Success
- Choosing pasta shells: Fresh or dried manicotti works beautifully. If fresh pasta is available, it provides a delicate texture; dried pasta must be cooked carefully to avoid over-softening.
- ricotta Prep: drain ricotta cheese in a fine-mesh sieve or cheesecloth for at least 30 minutes to avoid watery filling.
- filling finesse: Avoid overmixing the cheese filling; gentle folding preserves creaminess and prevents a grainy texture.
- Make-ahead: Assemble the manicotti the day before, cover tightly, and refrigerate. Bake directly from the fridge, adding 10 extra minutes to the baking time.
- Customize your filling: Add sautéed spinach, mushrooms, or minced herbs like basil for an extra layer of flavor and nutrition.
- Storage: Leftovers keep well refrigerated for up to 3 days and freeze beautifully for up to 2 months. Reheat covered to maintain moisture.
Serving Suggestions
Present your cheesy manicotti family-style on a rustic wooden board or elegant ceramic platter. Garnish with fresh basil leaves, a sprinkle of Parmesan, and a drizzle of high-quality extra virgin olive oil to elevate its richness. Serve alongside a crisp arugula salad tossed with lemon vinaigrette or garlic-roasted broccoli for a vibrant contrast. For sauce lovers, offer warm marinara and creamy Alfredo options to dip each bite into decadent pools of flavor, creating an unforgettable dining experience.

| Nutrient | Per Serving |
|---|---|
| Calories | 420 kcal |
| Protein | 22 g |
| Carbohydrates | 36 g |
| Fat | 18 g |
For another Italian classic to pair perfectly with your cheesy manicotti, check out our Classic Garlic Bread Recipe. Explore more about the rich history and health benefits of dairy in pasta dishes at EatRight.org.
Q&A
Q&A: Creamy Delight – Your Guide to Easy Cheesy Manicotti
Q1: what makes manicotti a classic favorite in Italian-American cuisine?
A1: Manicotti’s charm lies in its comforting layers-a tender pasta shell generously stuffed with rich, creamy cheeses and herbs, then baked to bubbly perfection. It’s a dish that combines simplicity with indulgence, offering a heartwarming experience that feels like a hug on a plate.
Q2: How can I simplify making manicotti without sacrificing flavor?
A2: The key to easy, flavorful manicotti is using quality ingredients and smart shortcuts. Opt for pre-cooked manicotti tubes or large pasta shells to save time. Use a blend of ricotta, mozzarella, and Parmesan for a luscious filling. Layer with your favorite marinara sauce,and bake covered for moist,melty results. A sprinkle of fresh basil or parsley at the end adds that vibrant, homemade touch.
Q3: What cheeses work best inside the creamy filling?
A3: Ricotta is the star for its silky texture,while shredded mozzarella adds gooey stretch. Parmesan brings sharp, nutty depth. For extra creaminess, some recipes sneak in cream cheese or mascarpone.Combining these cheeses creates a harmonious blend that’s both smooth and flavorful.
Q4: Can I customize the filling for dietary preferences?
A4: absolutely! For a vegetarian twist, add sautéed spinach, mushrooms, or roasted red peppers into the cheese mix. If you’re dairy-free,try plant-based ricotta alternatives made from tofu or nuts,paired with dairy-free mozzarella. The beauty of manicotti is its adaptability-feel free to get creative!
Q5: What are the best tips for baking manicotti to perfection?
A5: Cover your baking dish tightly with foil to trap moisture, ensuring the pasta cooks evenly and stays tender. Bake at a moderate temperature-around 350°F (175°C)-for 30-40 minutes until the sauce is bubbling. For a golden, bubbly top, remove the foil in the last 10 minutes and add a handful of extra mozzarella.
Q6: How should I serve manicotti to enhance the dining experience?
A6: Serve your creamy manicotti alongside a crisp green salad dressed in tangy vinaigrette, or oven-roasted vegetables to balance the richness. A glass of chilled white wine or light red complements the cheesy flavors beautifully. Don’t forget fresh bread to soak up every last bit of sauce!
Q7: Can manicotti be made ahead or frozen?
A7: Yes! Assemble manicotti in advance and refrigerate for up to 24 hours before baking.For longer storage, tightly wrap the assembled dish and freeze for up to two months. To bake from frozen,thaw overnight in the fridge,then proceed with baking as usual-adding a bit more time if needed.
Q8: What’s the secret to that irresistible “creamy delight” texture?
A8: It’s all about the balance of moisture and cheese. Incorporating a touch of beaten egg into the ricotta filling helps it set nicely without drying out. Using a hearty marinara sauce with a hint of cream or milk keeps everything luscious. Slow, gentle baking transforms the dish into a velvety, melt-in-your-mouth masterpiece.
With these tips and tricks, your cheesy manicotti journey will be a joyful adventure. Dive in, experiment, and savor every creamy, cheesy bite!
To Conclude
As you savor the last bite of your creamy, cheesy manicotti, you’ll realize that this classic Italian dish is more than just comfort food-it’s a celebration of simple ingredients transformed by love and technique. Whether you’re a seasoned cook or a kitchen newbie, this guide has hopefully unlocked the secrets to mastering manicotti with ease. So next time you crave a dish that’s rich, satisfying, and irresistibly cheesy, remember: a little patience, a handful of ingredients, and a dash of creativity are all you need to create your own creamy delight. Buon appetito!